How to Create Custom Patches for Your Travel Adventures
When it comes to immortalizing your travel adventures, creating custom patches can be a unique and personal way to capture the essence of each journey. By infusing your patches with symbols and designs inspired by your experiences, you can transform ordinary gear into tangible memories. But the process involves more than just aesthetics; it requires a thoughtful blend of creativity and practicality to ensure your patches stand the test of time and become cherished keepsakes. So, are you ready to embark on this creative journey and turn your travels into wearable stories?
“Make Your Clothes Stand Out” – Shop Patches
Key Takeaways
- Choose destinations based on personal interests and research costs.
- Design unique patch concepts inspired by landmarks and colors.
- Select high-quality materials like twill and essential tools.
- Create patch templates with desired shapes and sizes for visualization.
- Attach patches securely using sewing, adhesive, or iron-on methods.
Choosing Your Travel Destinations
When selecting destinations for your upcoming adventures, consider your interests, budget, and time constraints. Your interests play a crucial role in ensuring a fulfilling travel experience.
Whether you enjoy exploring historical sites, relaxing on a beach, or immersing yourself in vibrant city life, choosing a destination that aligns with your passions will enhance your journey.
Additionally, take your budget into account. Research the cost of accommodation, transportation, activities, and meals in your desired locations to ensure they fit within your financial means.
Time constraints are another important factor to consider. If you only have a few days for your trip, opt for a destination that’s easily accessible and doesn’t require extensive travel time.
On the other hand, if you have more flexibility, explore destinations that may be further away but offer unique experiences.
Designing Your Patch Concepts

Consider your patch design as a reflection of your travel experiences and memories. When designing your patch concepts, think about the unique aspects of each destination that stood out to you.
You can incorporate symbols, landmarks, or even colors that represent the essence of the places you visited. Here is a helpful table to organize your ideas for designing custom patches:
| Column 1 | Column 2 | Column 3 | Column 4 |
|---|---|---|---|
| Destination | Memorable Experience | Symbol/Icon | Color Palette |
| Paris | Eiffel Tower view | Eiffel Tower | Black, Gold, Silver |
| Tokyo | Cherry blossom season | Mount Fuji | Pink, White, Blue |
| Santorini | Sunset in Oia | Blue domes | Blue, White, Pink |
Selecting Materials and Tools
To bring your patch designs to life, the selection of materials and tools plays a key role in achieving the desired outcome.
When choosing materials, consider factors like fabric type, colorfastness, and durability. Opt for high-quality fabrics such as twill or canvas for a sturdy base that can withstand wear and tear.
For the design aspect, gather tools like fabric scissors, embroidery needles, and embroidery threads in various colors to bring your vision to reality.
Investing in a good quality embroidery hoop can help keep your fabric taut, making the stitching process smoother.
When it comes to adding embellishments, explore options like iron-on patches, sequins, or beads to add texture and detail to your patches.
Ensure that the adhesive on iron-on patches is strong enough to withstand washing and everyday use.
Creating Your Patch Template
When crafting custom patches for your travel adventures, creating a patch template serves as the foundation for your design.
This template will guide the placement of elements like text, images, and borders on your patch. To create a patch template, follow these steps:
- Choose the Shape: Decide on the shape of your patch. Whether it’s a classic circle, a bold square, or a fun custom shape, the outline will define the look of your patch.
- Select the Size: Determine the size of your patch based on where you intend to attach it. A larger patch might be eye-catching on a backpack, while a smaller one could be perfect for a hat.
- Outline the Design: Sketch out your design within the chosen shape and size. This will help you visualize how the final patch will look and ensure all elements fit harmoniously.
| Step | Description | Emotion |
|---|---|---|
| Choose the Shape | Decide on the outline of your patch. | Excitement |
| Select the Size | Determine the patch size for placement. | Anticipation |
| Outline the Design | Sketch your design to visualize the patch. | Creativity |
Embroidering or Printing Your Patch
Ready to bring your patch design to life? Once you have your patch template ready, it’s time to decide whether you want to embroider or print your patch.
Embroidering gives your patch a classic, textured look that’s durable and long-lasting. This method works well for intricate designs and adds a high-quality finish to your patch.
If you prefer a more colorful or detailed design, printing might be the way to go. Printing allows for a wider range of colors and intricate details that may be challenging to achieve through embroidery.
It’s a great option for patches with gradient colors or intricate patterns.
Consider the desired look, feel, and durability of your patch when choosing between embroidery and printing. Some companies offer both options, so you can choose based on your design and preferences.
Whichever method you choose, make sure to select a reputable manufacturer to ensure the quality of your custom patches.
Attaching Patches to Your Gear
Once you’ve got your custom patches ready, the next step is figuring out how to attach them to your gear securely. To ensure your patches stay in place during your travels, consider using a few different methods.
One popular option is sewing the patches onto your gear. Choose a sturdy thread that matches the patch’s colors and carefully stitch around the edges to secure it firmly.
If you prefer a no-sew option, adhesive patches or fabric glue can be used. Simply apply the adhesive to the back of the patch and press it firmly onto your gear.
For extra security, you can also reinforce the patch by sewing a few stitches around the edges after the adhesive has dried.
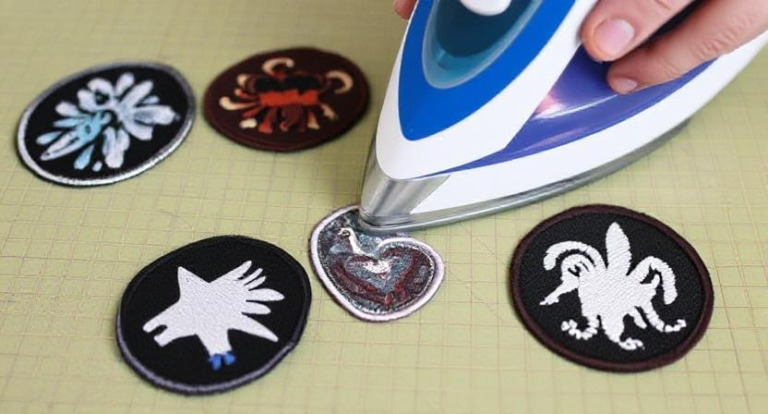
Additionally, iron-on patches are convenient and easy to attach. Just place the patch on the desired spot, cover it with a thin cloth, and iron over it following the instructions provided with the patch.
Whichever method you choose, make sure to attach your patches securely so they withstand your adventures.
Showcasing Your Travel Patch Collection
To display your impressive collection of travel patches, consider creating a dedicated patch display board. This board can serve as a visual representation of your adventures and memories from around the globe.
Here are some creative ways to showcase your travel patch collection:
- Arrange by Region: Group patches from the same continent or country together for a cohesive look.
- Mix and Match: Create visual interest by alternating between large and small patches or arranging them in a checkerboard pattern.
- Use Themed Frames: Frame your patches in shadow boxes or frames that complement the style of your patches.
- Add Photos: Enhance your display by interspersing photos from your travels among the patches.
- Personalize It: Include a map with pins indicating the locations you’ve visited to add a personal touch to your display.
Conclusion
Now that you’ve created your custom travel patches, it’s time to proudly showcase them on your gear and share your adventures with the world. These patches are not just symbols of your travels, but also reminders of the memories and experiences you’ve had along the way. Keep adding to your collection and let your patches tell the story of all the places you’ve been and the incredible journeys you’ve embarked on. Happy travels!
Frequently Asked Questions
Can I Wash My Gear With Attached Patches?
You can wash your gear with attached patches. Use a gentle cycle and turn items inside out to protect the patches. Avoid high heat and harsh detergents. Air drying is best to prevent damage.
How Do I Remove Old Patches From My Gear?
You can remove old patches from your gear by carefully peeling them off. Use a hairdryer to heat the adhesive for easier removal. Gently scrape off any remaining residue with a credit card.
Can I Create Patches for Virtual Travel Experiences?
You can easily create patches for virtual travel experiences by designing them digitally and then getting them produced by a custom patch maker. Display your virtual adventures proudly with unique patches!
Do Patches Work Well on Waterproof Materials?
Yes, patches work well on waterproof materials. They adhere securely and maintain their vibrant designs even in wet conditions. You’ll love how they add a personalized touch to your gear while keeping up with your adventures.
Can I Use Iron-On Patches for Outdoor Gear?
Yes, you can use iron-on patches for outdoor gear. They are convenient and easy to apply, adding a personal touch to your gear. Just make sure to follow the instructions for proper adhesion.


